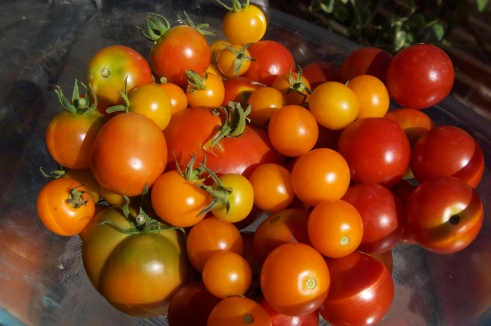
Summer tomatoes fresh from your own garden.  These tomatoes are prettier than flowers in my opinion.  My expectations for my first season of tomato-planting were actually pretty low.  Needless to say they have been exceeded “astronomically” (heh heh).

We have had them in all sorts of things, but to be honest I enjoy them best right off the vine and straight into my mouth.  My favorites are the little yellow ones.  They are so sweet I feel like I am eating candy when I eat them and I could easily imagine them in a dessert.  No wonder tomatoes are actually fruit.

In our recent trip to Quebec we learned that tomatoes can actually be used to make wine.  We found it tasted more like grappa than wine, but still, it just goes to show how sweet these guys can be.

Speaking of sweet, we’ve been enjoying our fare share of Niagara peaches this summer and I finally decided it was high time I make a peach pie.  I’ve made plenty of pies from blueberry to apple, but I hadn’t yet tried peach.  So I rolled up my sleeves and got rollin’

I used this recipe, because I know I can always trust Smitten Kitchen.  I didn’t change it up all that much, but used cornstarch instead of the instant tapioca.  I also made sure the six cups of peaches were really heaping.  In fact, I suspect I used closer to seven.

I decided to go the lattice route, which really is quite lovely and is worth the extra minute or two.  With such beautiful peaches on hand, it seems a pity to completely cover them up.

All you need is some strips of dough.  You lay four down on the pie and then lift alternating ones and hold them back while you slip in the other strips perpendicular.  In this case, I used a crinkled edge, but a straight knife cut works fine too.

The final product was peach heaven!  I am already dreaming about making another one, before peach season draws to a close.

Since I followed the recipe pretty much exactly, I won’t bother reproducing it here, but I thought I might offer some advice on pie dough.  People seem to think it is an awful lot of work or that is doomed to failure, but it is really easy to master.

The key here is to keep your butter cold.  Unlike cakes and cookies where the butter is mixed thoroughly with the sugar, you want little bits of butter in your dough.  So whatever you don’t mash the butter so that it melts away into the flour.  Really, no mashing, okay?

The butter should be mixed with the flour first to create a rough pea-like texture.  Again, bits of butter preserved and not mashed away.  Then you slowly add the water to bring the mixture together.  In order, to prevent mashing the butter in, at this point, handling the dough only a little is best.

From here everything needs to be well chilled before rolling.  Again, we are trying to keep those bits of butter!  Even after rolling it is a good idea to chill the dough before baking it off.

Here are a few ways to help keep that butter cold when you are making the dough:

  • Freeze the stick of butter before and then grate it on a box grater.  Freeze the grated bits before tossing it with the flour with your hands.
  • Put an ice cube in the water before you add it
  • Use a metal bowl to mix the ingredients that has been chilled in the freezer for a minute or two prior to
  • if at any point it looks like the butter is getting soft – put the whole works back in the fridge for a bit

Once you get the hang of mixing in cold butter, a pie can come together in under an hour!  How can you resist?

It seems like summer weather is finally here.  Gorgeous sunny days and long summer nights.  This is prime patio time!  Summer is the time for me to flex my salad making muscle.  Those of you that have followed this blog since the beginning know that probably half the recipes presented here are salad recipes.

There is nothing like a fresh bowl of tasty greens with lots of trimmings to graze on.

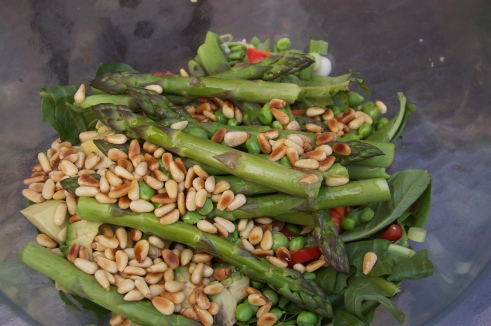
I was delighted to be introduced to a new salad to add to my repertoire. My wonderful partner surprised me with a roman salad filled with all sorts of tasty bits like avocado, pine nuts and asparagus.  It is incredibly easy, extremely versatile and truly addictive.

We served it up with delicious lamb-popsicles grilled to perfection and lovely roasted baby potatoes.  Oh summer nights – how I have missed you!

Roman Salad

  • a hearty handful of fresh peas
  • a bunch of asparagus with their ends trimmed
  • 1 red pepper chopped
  • 1 avocado
  • the juice of one lemon
  • a few cups of fresh arugula (we substituted with dandelion greens)
  • chopped chives or green onions
  • 1/2 cup of toasted pine nuts (watch out! these guys burn fast)
  • a good helping of shave pecorino cheese or parmesan
  • a few glugs of olive oil
  • salt and pepper

Lightly steam the asparagus and peas until they turn bright green and are not yet mushy.  Quickly rinse them in ice cold water to stop the cooking process and drain thoroughly.

Chop the avocado and place it in the salad bowl covering it with the lemon juice.  Add all the other veggies and toss with olive oil and salt and pepper.

Just when you are about to serve, mix in the cheese and pine nuts.

Enjoy on a gorgeous summer night!

Ramekins finally entered my life.  I usually try to resist accumulating too much kitchenware.  More often than not something you already have can do the job and clutter in the kitchen is something to be avoided at all cost.

That said, recipe after recipe kept coming up that needed little bowls that can take the heat of the oven.  Fortunately, ramekins can also serve a variety of other purposes and so I decided I needed a set.  In short, I caved to dreams of hot little chocolate pots and asked someone to treat me to these for a gift.

My Christmas wish came true and since that time, we’ve made quite a few delicious treats including baked eggs with chives and tomatoes, chocolate lava cakes and this delicious dessert – chocolate whiskey pots de crèmes.  You will notice that 2/3 of these things require chocolate…

What I love about these chocolate pots is that you can flavour them however you like and you can whip up just one or two servings if you’re scared that you might just eat a dozen if they were sitting around.

They make the perfect bed for fresh berries, whipped cream and, if you want to go overboard, chocolate shavings.  They are also just fine on their own.

So if you are one of the lucky folks out there that owns a set of ramekins – give this recipe a try.  If you don’t, I think you might be able to pull this off by using a muffin tray and just filling the empty holes with some water so that the tray doesn’t bend.  However, you and your guests will have to communally share that muffin tray – but for the love of chocolate – some of us will go to great lengths!

Chocolate Whiskey Pot De Cremes (serves 4) adapted from Tartelette

  • 3 egg yolks
  • 2-3 tbsp. honey (depending on how sweet you want it)
  • 1/2 cup cream (I used 35%)
  • 1/4 cup milk
  • 3 oz or three squares of dark chocolate (bittersweet)
  • 2 tbsp. whiskey (use another flavour if you like – vanilla, cointreau, etc.)
Preheat oven to 350F.
Whisk honey with egg yolks for a while until the egg yolks are nice and pale and frothy.
Bring milk and cream to a light simmer in a small pot.  Remove from heat and add chopped chocolate.  Stir until chocolate is melted.  Return for a moment to heat if needed.
Let cool a little and then pour into eggs, whisking constantly to prevent the eggs from cooking.

Add whiskey or other flavour and then divide into your ramekins.  Put the ramekins in a roasting pan and fill it with hot water.  Place the pan with the ramekins into the hot oven.

Bake for 30-40 minutes until the pots are set.  Remove from oven and cool to room temperature before placing in the fridge.  Chill for at least two hours.  The little pots keep for a few days.

I like to serve it with fresh berries and vanilla whipped cream.

Enjoy!

Image

It has been too long.  What can I say…  After far too long a time, spring has inspired me to get back to this blog.  All the lovely fresh produce has put a spring in my step and I am eager for the summer’s bounty.

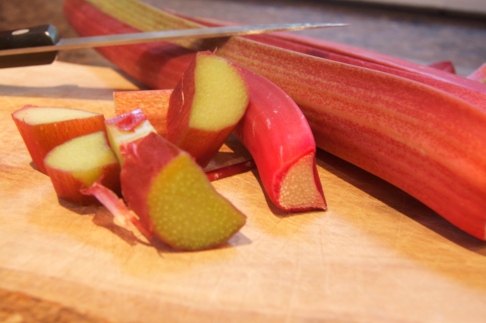
As soon as the first spring blossoms appear on the scene I start to ask myself – ‘where is the rhubarb?’ followed by – ‘where is the asparagus?’.  These are pretty much two of my top ten ingredients to cook with.

Needless to say I was thrilled when our two gardening guru friends brought us over a bushel of their first rhubarb crop.  I could barely hold myself back from making a crisp on the spot.

Image

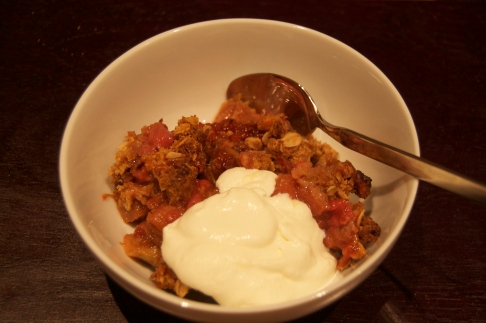
I think a good crisp might just be my all time favourite dessert.  I love the juicy fruit coupled with the crumbly topping all coming together in one big bowl.  It feels like a warm hug.

Crisps are really easy to make it and there are so many recipes out there I don’t really think I need to give you another one.  I will share my top crisp tips though and my adaptations to Heidi’s recipe on 101 Cookbooks for strawberry rhubarb crumble, which was the final resting place for this luscious spring bounty of mine.

Please share your own fancy tips and tricks to making the perfect crisp!

Tips 

  • I always add baking powder to my crisp or crumble topping.  It makes it puff up nicely into big chunks.
  • After I incorporate the butter into a crisp, I make sure it has a crumbly texture (i.e. large chunks).  I then put this in the freezer for 10-15 minutes before I put it on top of the fruit and in the oven.  This makes sure the crumble stays crumbly.
  • I like to add nuts and oats to my crumble.  It gives it more texture.  I like Heidi’s recipe but I swapped the pine nuts for walnuts, just because that’s what I had.  Crisp are very forgiving.Image
  • Many crisp recipes call for excessive amounts of sugar.  I like the fruit to take center stage.  Heidi’s recipe does that for sure, but I was even scant with her sugar amounts.
  • I also added a zing of fresh lemon zest, which always livens up a crisp.
  • While ice cream is certainly my go-to sidekick for crisp, here I tried ricotta mixed with a little cream and more lemon zest.  It had more refreshing and earthy flavour.

Image

I am glad to be back!  Happy Spring everyone!

Here is the second installment of my Mom’s birthday menu.  It was a pretty elaborate dinner and I was quite please we pulled it off considering there were so many first tries for me.  I probably should have shared this recipe first as it was the appetizer, but I couldn’t wait to share the dessert!

Simon and I have wanted to try to do foie gras for some time.  While we were in Germany, we had the good fortune to be able to go to a French restaurant with my supervisor and his wife.  It was certainly a memorable experience and I can remember each dish vividly.  It was there that we were introduced to foie gras.

I must say I hesitated to eat it at first because I’d heard so many horror stories of how the ducks and geese are treated, but peer pressure forced me to succumb and I indulged.  It was spectacular and since then we have wanted to try and do it ourselves.

While I was in Paris for a conference, I purchased two small tins of duck foie gras to bring home for our experiments.  We decided to sear the foie and serve it with a rhubarb compote.

For those of you who are still thinking of the ducks and geese, I urge you to have a look at this article.  While I may just be making myself feel better, I did find it informative and well-written.

If you do decide to give it a try, be sure to take your time making the recipe.  Foie gras is very expensive, so one wouldn’t want to let it go to waste.

Foie Gras & Rhubarb (adapted from: Emril Lagasse)

  • 3/4 1bs. of chopped rhubarb
  • 1/2 cup sugar
  • juice of 1 lemon and a bit of grated lemon zest
  • 1 cup of white wine
  • 1 finely minced shallot
  • salt and pepper
  • 1 tin of foie gras (pre-chilled in the fridge)
  • chopped chives and mixed greens as garnish

In a saucepan combine all ingredients except the foie gras.  Bring to a simmer until the rhubarb is softened.  Take off the heat and let cool a little before pureeing in a blender or with an immersion blender.  Set aside and let it come to room temperature.  Note that you can make this ahead and store in the fridge, but let it come to room temperature before using.

For the foie, take the can out of the fridge and open both ends with a can opener.  Push the log out from the other end onto a cutting board.  Heat some water and prepare your sharp knife.  Heat a fry pan to medium heat (no oil – just dry).  Dip the knife in hot water.  Dry it quickly and slice off a round of foie gras that is a about a pinky finger thick.  Repeat until all slices are done.

Season the slices with salt and pepper. Drop them into the hot pan.  It will sizzle and smoke.  Allow them to brown on one side and then quickly turn them over.  Once they are brown on both sides, pull them off the heat.  On each plate, put  a few tablespoons of rhubarb and top with one or two slices of foie gras.  Garnish with chives and greens.  Serve with bread or toasts.

The weather has been fabulously hot here.  I can hardly even remember what rain is like.  Every day this month we’ve had clear blue skies and high temperatures.  While it has been wonderful to have such sunny skies, the heat has certainly taken its toll on us and I have been avoiding the oven like the plague.

On the weekend we celebrated my Mom’s 58th birthday.  We were a bit late in celebrating so we decided to do it up right with a big meal with many courses.  We made a lot of things, but I could not bring myself to bake a cake on such a hot day.  We opted instead for dessert which showcased the fresh fruit in season right now – red raspberries!

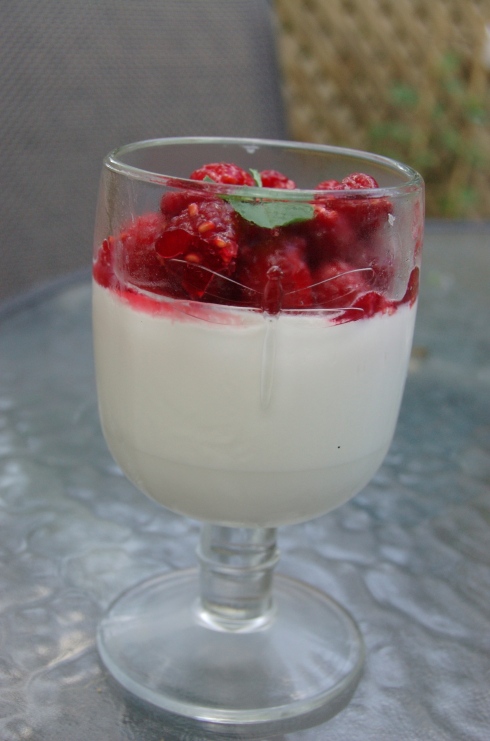
The raspberries were sauced in their own puree and sat atop a soft pillow of jelly vanilla cream.  It was my first stab at working with gelatine and I was pretty pleased with the results.

I got the recipe from a Food & Drink magazine that my Mom had lent me a little while ago.  Although I was nervous to use the gelatine for the first time, it came together very quickly and only needed a few ingredients.  I think it will definitely become part of the summer dessert repertoire.

I hope to share at least one more recipe from the birthday dinner so stay tuned!

Raspberries & Potted Cream

(note: 1 Tbsp of gelatine was one envelope in the KNORR package.  While the package said to use with 2 cups of liquid, I followed the Food & Drink recipe, which had 3 cups and it set just fine.)

POTTED CREAM

  • 1 Tbsp of gelatine
  • 1/4 cup cool water
  • 2 cups whipping cream
  • 1 cup whole milk
  • 1/2 tsp of pure vanilla extract or about half of a large vanilla bean
  • 3 Tbsp. of sugar
RASPBERRIES
  • 1 1/2 cups of raspberries (the fresher the better!)
  • 2 Tbsp. sugar
  • 1 Tbsp. water
small mint leaves to garnish
For the cream, sprinkle the gelatine over the water in a large mixing bowl.  In a saucepan combine the milk, cream, sugar and vanilla extract.  If you are using a bean, split it and scrape in the seeds.  Put in the pod to infuse the milk while heating.  Slowly heat the cream while stirring, until it comes to a simmer.  Fish out the bean or strain the cream and then pour it over the gelatine.  Stir well so the gelatine dissolves.  Divide the mixture into 4-6 glasses.  Cover each glass with cling wrap and refrigerate at least six hours or until set.
For the raspberries, combine a half cup of berries with the water and sugar.  Mash it up with a fork.  Toss in the remaining raspberries and stir to coat.  Top the set cream with the berry mixture and garnish with mint leaves if desired.  You can chill it again until you are ready to serve.

It has been far too long since I’ve updated.  I’ve missed it very much.  Fortunately, just because I haven’t written doesn’t mean I didn’t have some pretty awesome food these last months.  April and May were a bit dreary, but ever since the warm weather hit we’ve been out on the balcony enjoying the fresh summer fare.

Today was no exception.  After my run, I stopped off at our local farmer’s market to see what might look good for dinner.  The first stand caught my eye with a beautiful bag of zucchini blossoms.  I’ve never cooked them, but I’ve always wanted to so I decided they were going to be on my plate tonight.

The friendly chap instructed me to bread them and fry them and that is exactly what I did.  Paired with tossed greens, a summer fresh tomato and homegrown basil it was delicious meal and perfect for a summer night.  If you come across these little gems be sure to pick them up and give them a try.

Zucchini Blossoms


  • 1 egg lightly beaten
  • fresh bread crumbs
  • salt and pepper
  • grated parmesan cheese
  • zucchini blossoms
Rinse and dry your blossoms.  Prepare a saute pan with a little oil and heat to medium high.  Mix the bread crumbs with the salt and pepper and the cheese.  Dip each blossom in the egg and then crumbs.  Drop in the pan.  Cook on each side until golden.  Be sure to use the best quality ingredients you can as this is a simple recipe that really shines with good stuff.  Enjoy it with other market and garden fresh items.
Here is to summer!


It was a Sunday morning and we were together as a family discussing what we might make for dinner.  We tossed around the idea of fish, a roast and pasta.  Someone said chicken and that’s when I remembered the salt-crusted chicken on Chocolate & Zucchini, a blog that has never failed me.

It involves wrapping the chicken in quite a large amount of salt and baking it.  The crust is then cracked open discarded and a moist chicken is revealed.  Everyone was intrigued and so we decided to give it a go.  I’ll share the steps with you now, but I encourage you to check out Clotilde’s site for the exact directions.

You begin with a bird like the one you see above.  You insert a few crushed cloves of garlic in the inside and under the skin you stuff handfuls of parsley.

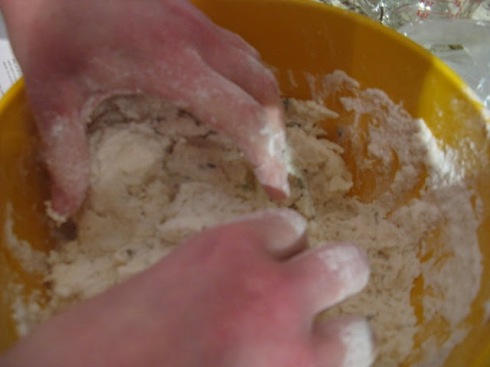
In a big bowl you mix together 3 3/4 cup of flour, 1 1/3 cups of coarse salt, 3 Tbsp. of fresh thyme and 4-5 large egg whites.  Then you add some water (2/3 – 1 cup water) and mix until a dough forms.  I found this a little tough and I needed a bit more water, but with strong hands you can manage.

Then you roll out the dough into a huge circle in order to envelope the chicken.  You plop the bird on top and carefully wrap it in the dough.  It will look like a little mummy.

You move the wrapped bird onto an oiled pan and insert it into a preheated 400°F oven.  Let it cook for 1 1/2 hours.  Clotilde says cooking it longer won’t hurt it one bit.  In the meantime you can prepare some delicious sides like these roast vegetables –

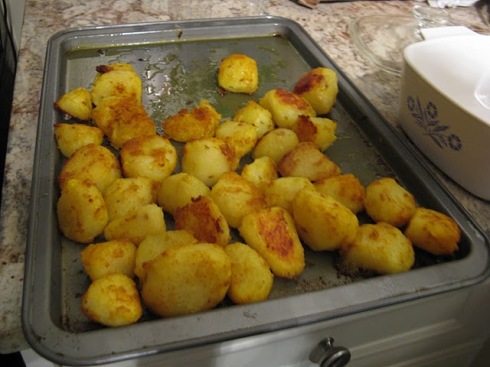
or Simon’s fantastic saffron crusted potatoes (I promise a post about these soon!)

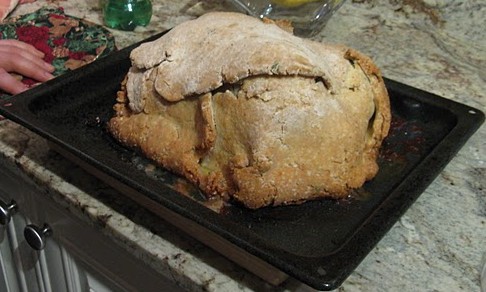
After the time is up.  You take the baked bird out of the oven.  The crust will be a nice golden brown and the smell of roasted chicken will be permeating the air.

This when you break out your hammer and let the fun begin.  Cracking open the chicken proved to be quite a pleasure indeed.  After smacking it a few times, you can peel away the crust, revealing a moist delicious chicken insided.

The chicken was indeed one of the best I have ever had and it was super fun to make.  I must admit though, I did miss the crunchy skin.  I certainly intend to try Clotilde’s other wrapped bird recipe –chicken in a bread crust!

After far too long Simon and I made it back to the woods for two nights of winter camping at Maple Leaf Lake in Algonquin Park.  This was our third winter camping trip and once again we wished we could have stayed longer.  We had some wonderful fires and walks on icy lakes.  We came back refreshed and even a little tanned.  It just goes to show that you don’t need to fly south to have a vacation in winter!

Winter camping presents its own set of challenges, but one of the benefits is that you can bring a variety of foods that you normally couldn’t in summer.  In the end everything stays frozen.  In the coming weeks, I’ll post some special winter camping recipes, but first I wanted to share a camp recipe that is good in both summer and winter.  It is one of our favourites and we take it a long on every trip.

The key to preparing your food for camping is to pack everything you need for each meal in ziplock bags.  Never ever bring food in all its original packaging.  You want to save as much space and weight as possible so bringing only what you need is essential.  I pack each breakfast and supper in a ziplock bag and mark how much water is need and other instructions on the outside.

This recipe is for a breakfast omelet and it is the perfect filling fuel for a day in the woods.  Believe it or not eggs can be easily brought in with you.  In summer, I try to eat the eggs on the first breakfast so they don’t go bad, but eggs do keep quite well. Here are the instructions for your own special eggy breaky in the backcountry.

Backcountry Breakfast Omelet (breakfast for one, multiply as needed)

  • 1 freezer ziplock bag
  • three eggs
  • add ins: bacon bits, grated parmesan cheese, chopped green onions, salt and pepper

At home:

Break your eggs into the ziplock bag (1 bag per person).  Dump in your add-ins.  Push all the air out of the bag and seal.  If you are more than one, group the egg bags in one larger ziplock bag for added protection and ease of storage.

At Camp:

Bring a large pot of water to a boil on either a camp fire or your camp stove.  Put the individual egg bags in the water.  Don’t worry, the ziplock bag won’t melt.  Let the bags sit in the hot water for several minutes.

Every once in a while pull them out and push on them a bit to allow any raw egg to spill out above the cooked exterior.  This will reduce the cooking time.  Once the eggs are cooked, dump them into your bowl and enjoy the tasty omelet with a cup of coffee or tea.

This meal comes together very quickly and has very minimal clean up.  It makes a perfect meal choice for a long day of hiking when you need to pack up quick!

Valentine’s day is on its way.  To be honest, I never really get worked up about it.  For me any day is a great excuse to cook up a fantastic dinner with my love.  However, if you are looking for a special dinner on February 14th, then here are two tips:

1) Stay home and cook dinner together.  Cooking is fun and you’ll be able to avoid all the hassle of getting reservations.

2) Cook really simple, but great quality food.  Who needs the stress?

While there are plenty of things one can make that are simple, I recommend seafood for an extra special Valentine’s.  It comes together super quick and if you buy good quality, it is always delicious.  Plus it isn’t too heavy so you’ll have plenty of room for some tasty chocolate treats afterward.

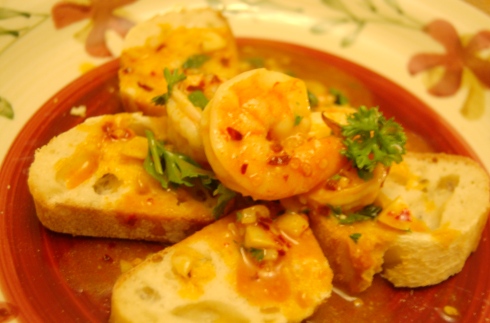
Here are two recipes that you can either use together or solo depending on your plans.  The first is a classisc Spanish Gambas recipe. It comes together so quickly and yet the sauce and the shrimp are positively perfect.  I recommend it as an appetizer, but you could serve it as a main as well.

Spanish Gambas

  • fresh, deveined and shelled jumbo shrimp (3-4 per person for an appetizer)
  • chili flakes
  • garlic, minced
  • 1/3 cup olive oil
  • lemon juice
  • sherry
  • fresh parsley
  • serve with baguette

After you have cleaned your shrimp, heat a small fry pan with olive oil.  Toss in your garlic and chili (vary the amounts depending on your taste). Let them cook a bit, but be careful not to burn the garlic.  Toss in the shrimp along with a bit of lemon juice and a glug of sherry.  Toss it well and wait for the shrimp to turn pink.  Sprinkle liberally with parsley and serve with fresh bread.

My next recipe suggestion is mussels.  They are also very quick to prepare and fun to eat.  There are many simple recipes out there that involve steaming them in a bit of white wine, but recently we tried a great recipe from The Guardian that also used chorizo sausage.  It was a bit more work, but still very simple.

The key with mussels is to buy very fresh ones.  Most fish mongers will beard them for you, but be sure to check.  It is also important to toss out any that don’t close their shells when you pinch them or if they have broken shells.  Aside from this they are one of the easiest dishes to prepare.  For a main meal you should count on about 1 lb. of mussels per person.

Mussels with Chorizo

(from The Guardian)

Serves 4

  • 2 tbsp olive oil
  • 100g chorizo for cooking, chopped (or other hot sausage)
  • 1 small shallot, peeled and finely chopped
  • 2 cloves of garlic, peeled and thinly sliced
  • 1 large tin of chopped tomatoes
  • 1 cup dry white wine
  • 4 lbs. mussels, cleaned
  • Small handful flat-leaf parsley leaves, finely chopped
  • Salt and pepper

In large pot heat the olive oil and sauté the sausage until it is cooked.  Add the shallot and garlic and allow it to soften.  Then add your tomatoes and allow them to heat through.  Allow the sauce to simmer and thicken.  Add the wine and let the sauce reduce for another few minutes.

Toss in the mussels with the parsley and stir it up.  Put the lid on and wait a few minutes until the shells have opened.  If some mussels don’t open, discard them.  Season with salt and pepper how you like.  Once again, serve it up with fresh bread to soak up the sauce!  A green salad on the side is also an excellent addition.

Don’t forget a delicious dessert and you will be sure to have a meal to please!  Happy Valentine’s Day!